It’s hard to know where to start with a complex skill like crevasse rescue. Rope handling? Reading a glacier? Mechanical advantage? Guide Niels Meyer highlights what’s critical.
I pulled into Stanley, Idaho, on a sleepy Wednesday night in April, eagerly anticipating a four-day, hut-based ski mountaineering course with Sawtooth Mountain Guides. While an unstable snowpack denied us any consequential terrain, our team of guides walked us through ski mountaineering skills on safer slopes: crampon (ski and boot) use, self-arrest techniques, tying and retying knots and building anchors. Ultimately, we were laying a base, both for safe travel on steep or glaciated terrain, and, as it turns out, to perform a crevasse rescue.
Crevasses form when glaciers (giant rivers of ice) crack. Guide and part-owner of Sawtooth Mountain Guides Niels Meyer describes the phenomenon using a candy bar analogy. “If you take a Snickers and you bend both of the ends upwards, that’s like a compression zone (like a flat area of a mountain), and you’ll see everything crunches up together—there are no gaps [no crevasses],” he explains. “But if you pull both sides down, that’s like a glacier going over a rollover. The top of the candy bar opens up, and that’s where a crevasse would potentially form.” While it’s not a hard-and-fast rule, it’s a helpful visual.
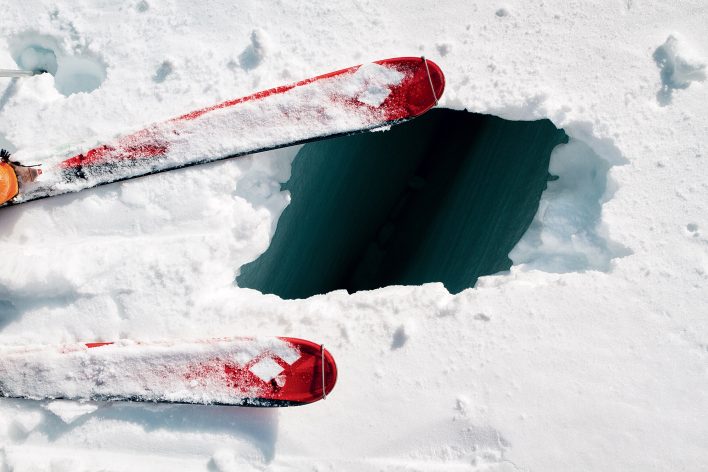
Jim Harris peeks into the blue room in Alaska’s Granite Range after enlarging the view with his pole. Jim Harris
“Not falling in the crevasse in the first place is the best prevention,” Meyer says with a laugh, when I ask where to start with crevasse rescue. It’s why he recommends learning how to safely travel on and read a glacier before preparing to rescue someone.
Size and snow coverage of glaciers vary based on geography and season, so do your research. Once you’re there, “The first piece of the puzzle is looking at the terrain and figuring out where you’re most likely to find crevasses,” Meyer says. “And then you’re looking for sagging snow bridges, or little, little pieces of a crevasse showing that’ll tell you that maybe it goes for a longer distance other than that little piece.” This is where, roped up and thoroughly probing, you can try to figure out where that crevasse lies.
It’s a skill Meyer taught and practiced during the three summers he guided on rock and glaciers in the Cascades, which is also where he began teaching glacier travel and crevasse rescue. Eventually, he started working with Sawtooth Mountain Guides, and, when he had the opportunity to buy into the business a year later, he took it.
Although he now spends less time on glaciers, Meyer is no less dialed when it comes to ropes and rescues.
Executed with a system of pulleys—which can be created using a variety of pieces of equipment—and stipulated on the idea of mechanical advantage, crevasse rescue can feel intimidating. The beauty is it’s a skill you don’t need snow, or actual crevasses, to learn or practice. “I learned with a tree as an anchor in a grassy backyard,” Meyer recalls. Now, he says, “I do a lot of dryland practice.”
The art of crevasse rescue comes down to understanding mechanical advantage and building a haul system that establishes one. With an anchor, a rope, a couple of carabiners and two pieces of cord that can work as friction hitches, you can do it just about anywhere.
“You are creating a system so that when you pull on one end with, call it, one force, whatever is on the other end of that rope is feeling more force,” Meyer explains. That’s mechanical advantage. For a crevasse rescue, you are typically establishing a 3:1, 5:1 or 6:1 mechanical advantage, depending on how much extra force you need. The trick (and challenge) is knowing how to count your mechanical advantage. “If you can count it,” Meyer says, “you can build it.”
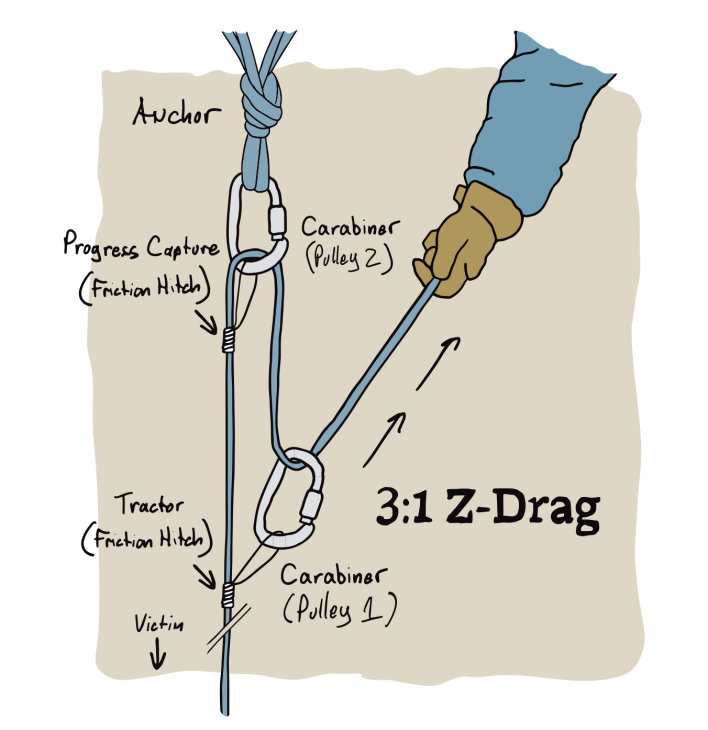
The 3:1 Z Drag, pictured in the diagram above, is a standard haul system for crevasse rescue.
Within any crevasse rescue haul system, as Meyer explains, there are two key components: the tractor (what pulls on the direct rope to the victim) and the progress capture (what prevents the weight of the victim from pulling the rope back through the pulleys). Both can be built with friction knots or locking devices. The rest of the rescue system comes down to building anchors, tying knots and organizing your rope in the proper order, but that’s for another article.
“Once you learn [crevasse rescue], you just need to train and practice those skills,” Meyer says. Then challenge yourself by trying to teach it to someone else. “When all of a sudden you have to teach it, you really need to understand it a lot better because you need to understand how to explain it to someone in a way that they will comprehend,” he continues. (Writing an article, as I’ve found, also helps.)
This article was originally published in Issue No. 156. To read more, pick up a copy, or subscribe to read our stories when they’re first published in print. For more on this skill, check out our crevasse rescue resources page. For ski mountaineering gear reviews see our Gearboxes for Ski Mountaineering and Ropes.

Related posts: